Microsoft Azure Installer
On this page, we explain step by step how to install CloudPanel on Microsoft Azure.
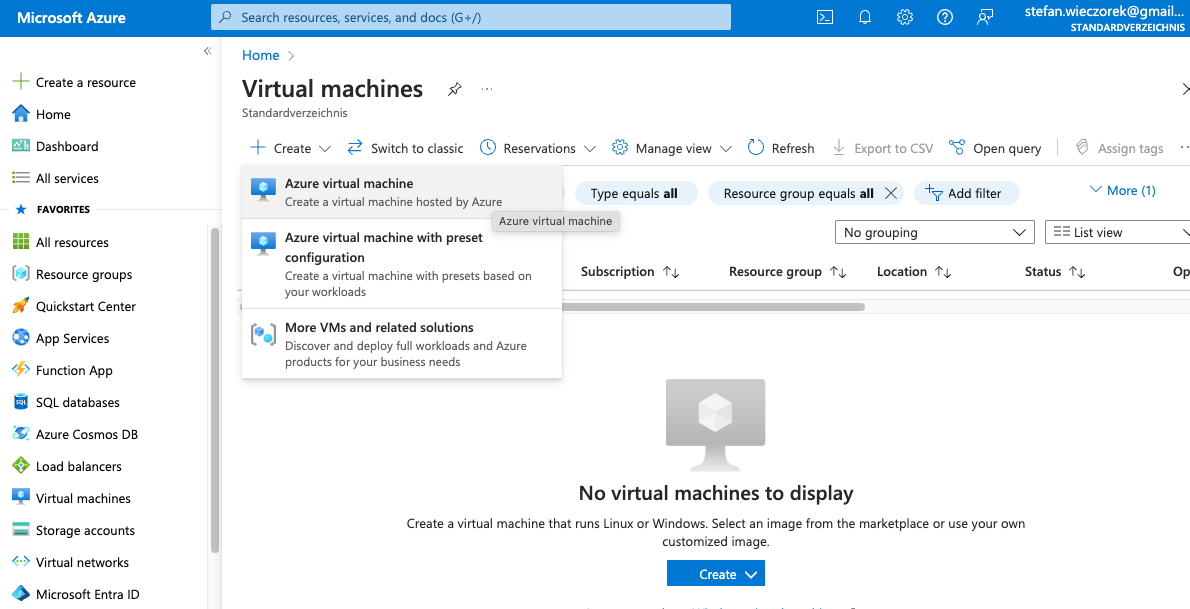
Launching a Virtual Machine
Log in to the Microsoft Azure Portal.
Go to Virtual Machines and click on Azure virtual machine.
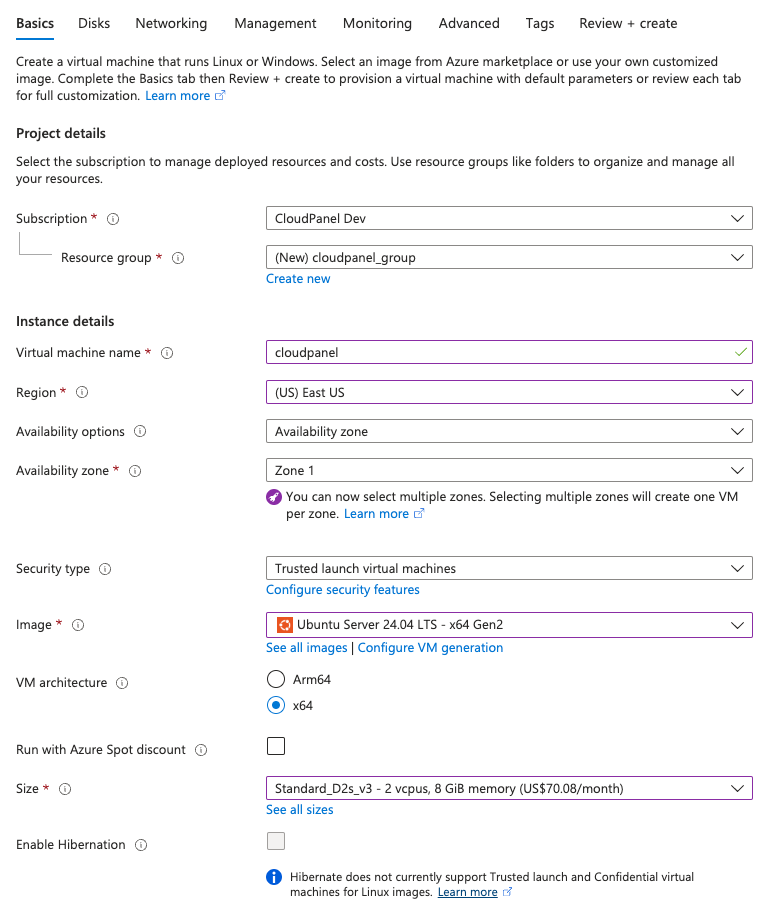
Instance details
Enter the name of your Virtual Machine, select a Region, select Ubuntu 24.04 or 22.04 or the Debian 12 or 11 image
and choose the size of your instance.
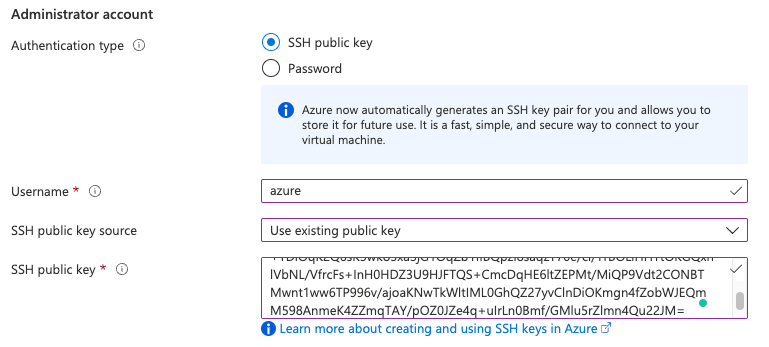
Administrator account
As Authentication type select SSH Public Key (recommended) or Password.
On the following site, you can learn how to create an SSH Public Key:
https://docs.microsoft.com/en-us/azure/virtual-machines/linux/mac-create-ssh-keys
Enter the Username and your SSH Public Key.
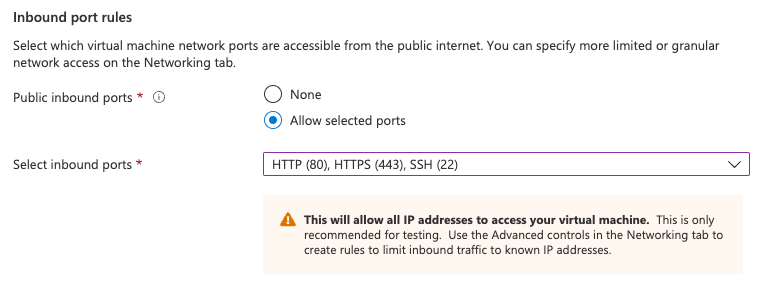
Inbound port rules
Select which virtual machine network ports are accessible from the public internet.
You can specify more limited or granular network access on the Networking tab.
Select the inbound ports: HTTP, HTTPS and SSH and click on the button Next: Disks >
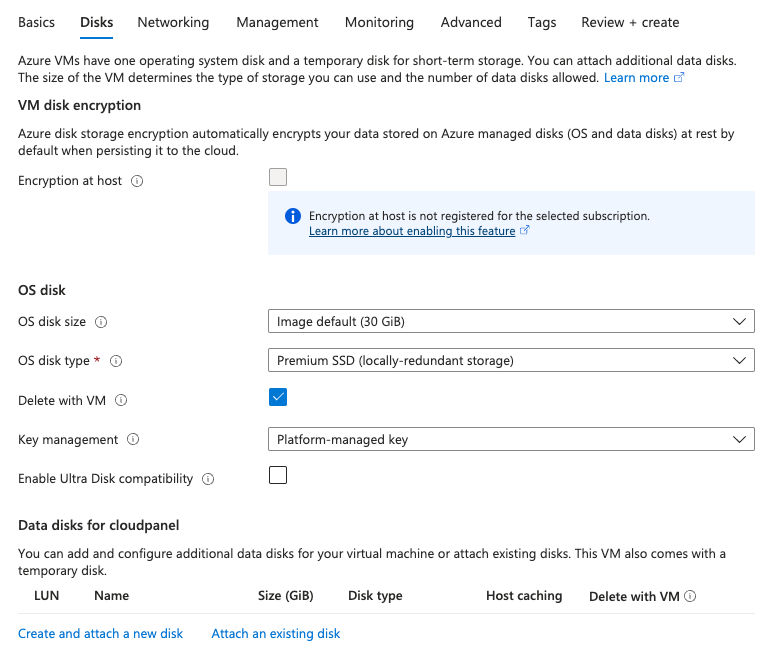
Disks
Select Premium SSD as OS disk type and continue to Review + create.
Review + create
Click on the button Create to launch your virtual machine.

Firewall
To access the CloudPanel after the installation, we need to create a firewall rule.
- Click in the left navigation on Networking --> Network settings and click on the button Create port rule.
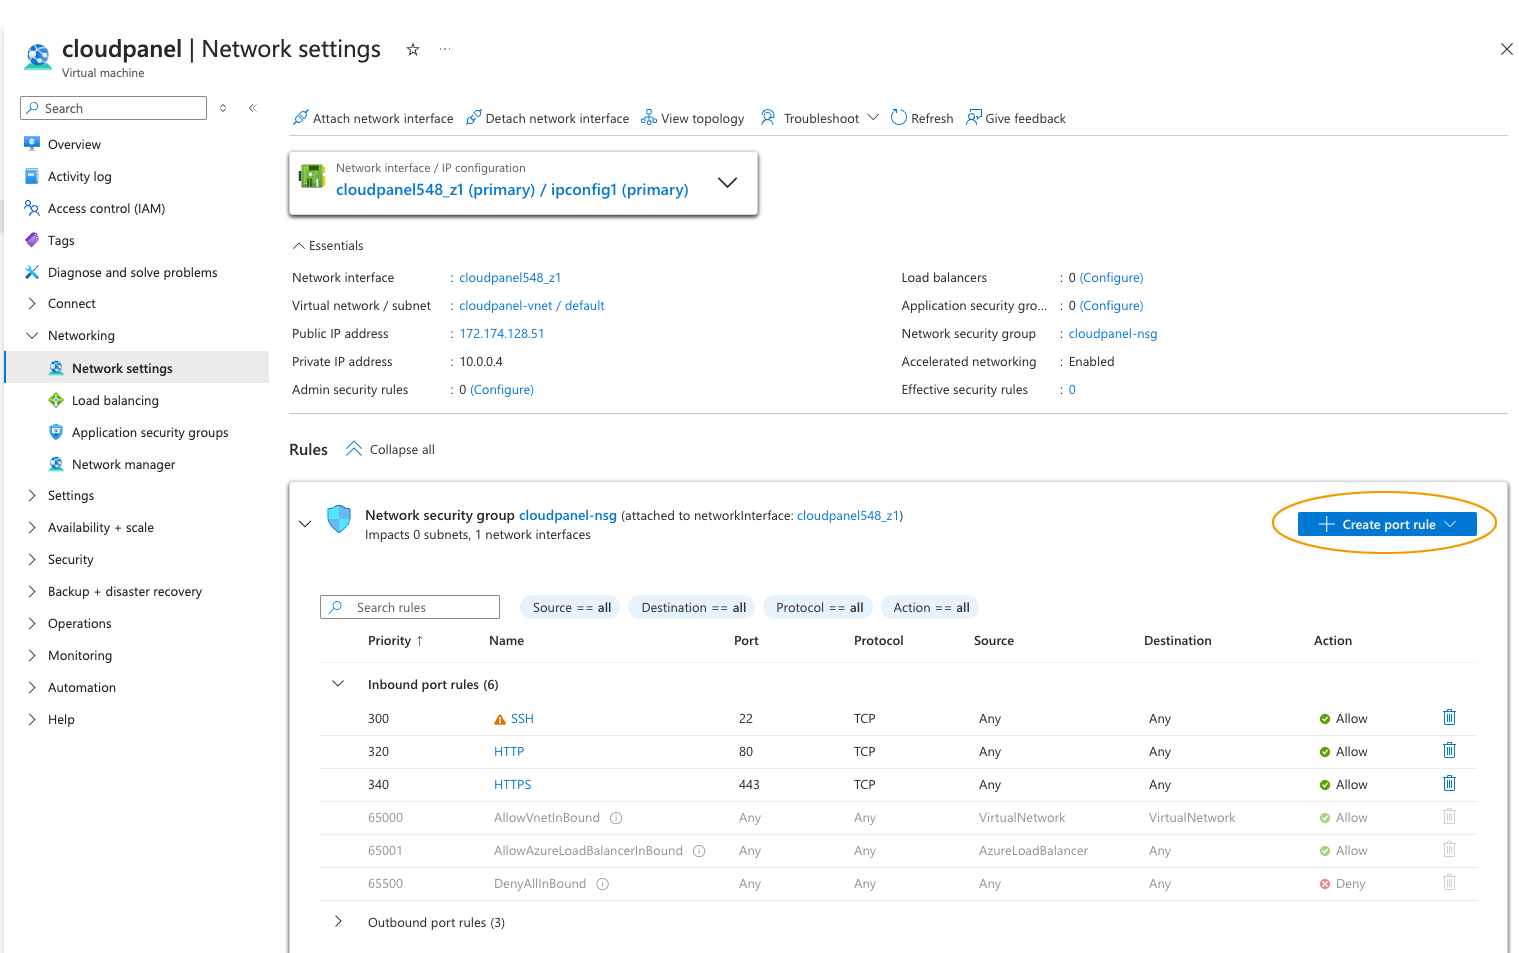
- Create a firewall rule to allow all TCP traffic.
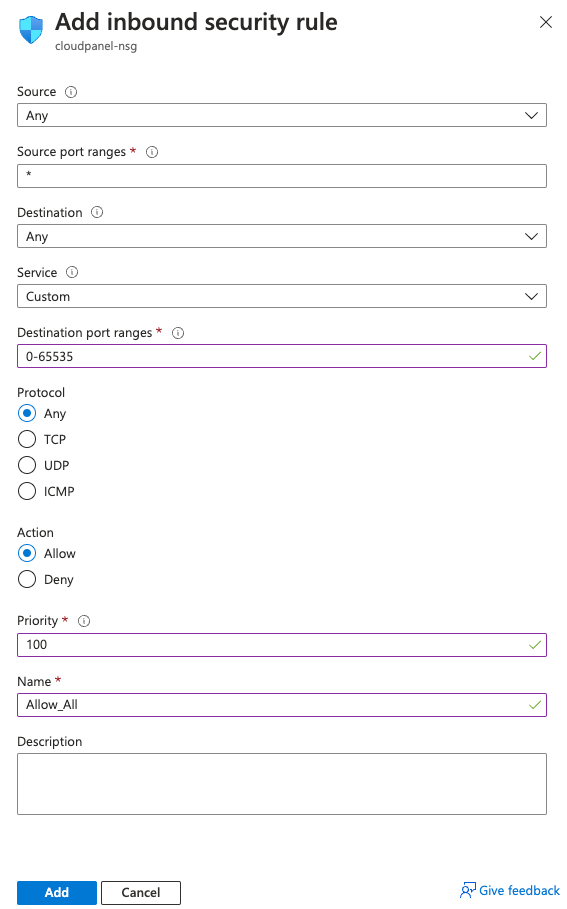
Security
This firewall rule opens ALL ports. CloudPanel has an integrated Firewall which takes care of the ports.
If you want to use the Firewall Rules from Azure, you need to open the TCP ports: 22, 80, 443, and 8443 (CloudPanel).
Also, open port 443 for UDP to allow HTTP3 connections.
Don't forget to remove all rules in the admin area of CloudPanel to disable the UFW Firewall.
Source: Any
Source port ranges: *
Destination: Any
Service: Custom
Destination port ranges: 0-65535
Protocol: Any
Acton: Allow
Priority: 100
Name: Allow_All
Install CloudPanel
After launching the Instance, log in with SSH and run the installer script.
- Ubuntu 24.04 LTS
- Ubuntu 22.04 LTS
- Debian 13 LTS
- Debian 12 LTS
- Debian 11 LTS
- Login via SSH to the Instance.
ssh -i path_to_your_private_key azure@yourIpAddress
- Switch to the root user:
sudo su root
- Update the system and install the required packages.
apt update && apt -y upgrade && apt -y install curl wget sudo
- Run the installer with your preferred Database Engine.
- MySQL 8.4
- MySQL 8.0
- MariaDB 11.4
- MariaDB 10.11
curl -sS https://installer.cloudpanel.io/ce/v2/install.sh -o install.sh; \
echo "6eac061df80f08b75224fcd7fce2f115e201696d8a6122e31abf7259a813b462 install.sh" | \
sha256sum -c && sudo CLOUD=msa DB_ENGINE=MYSQL_8.4 bash install.sh
curl -sS https://installer.cloudpanel.io/ce/v2/install.sh -o install.sh; \
echo "6eac061df80f08b75224fcd7fce2f115e201696d8a6122e31abf7259a813b462 install.sh" | \
sha256sum -c && sudo CLOUD=msa DB_ENGINE=MYSQL_8.0 bash install.sh
curl -sS https://installer.cloudpanel.io/ce/v2/install.sh -o install.sh; \
echo "6eac061df80f08b75224fcd7fce2f115e201696d8a6122e31abf7259a813b462 install.sh" | \
sha256sum -c && sudo CLOUD=msa DB_ENGINE=MARIADB_11.4 bash install.sh
curl -sS https://installer.cloudpanel.io/ce/v2/install.sh -o install.sh; \
echo "6eac061df80f08b75224fcd7fce2f115e201696d8a6122e31abf7259a813b462 install.sh" | \
sha256sum -c && sudo CLOUD=msa DB_ENGINE=MARIADB_10.11 bash install.sh
- Login via SSH to the Instance.
ssh -i path_to_your_private_key azure@yourIpAddress
- Switch to the root user:
sudo su root
- Update the system and install the required packages.
apt update && apt -y upgrade && apt -y install curl wget sudo
- Run the installer with your preferred Database Engine.
- MySQL 8.0
- MariaDB 11.4
- MariaDB 10.11
- MariaDB 10.6
curl -sS https://installer.cloudpanel.io/ce/v2/install.sh -o install.sh; \
echo "6eac061df80f08b75224fcd7fce2f115e201696d8a6122e31abf7259a813b462 install.sh" | \
sha256sum -c && sudo CLOUD=msa DB_ENGINE=MYSQL_8.0 bash install.sh
curl -sS https://installer.cloudpanel.io/ce/v2/install.sh -o install.sh; \
echo "6eac061df80f08b75224fcd7fce2f115e201696d8a6122e31abf7259a813b462 install.sh" | \
sha256sum -c && sudo CLOUD=msa DB_ENGINE=MARIADB_11.4 bash install.sh
curl -sS https://installer.cloudpanel.io/ce/v2/install.sh -o install.sh; \
echo "6eac061df80f08b75224fcd7fce2f115e201696d8a6122e31abf7259a813b462 install.sh" | \
sha256sum -c && sudo CLOUD=msa DB_ENGINE=MARIADB_10.11 bash install.sh
curl -sS https://installer.cloudpanel.io/ce/v2/install.sh -o install.sh; \
echo "6eac061df80f08b75224fcd7fce2f115e201696d8a6122e31abf7259a813b462 install.sh" | \
sha256sum -c && sudo CLOUD=msa DB_ENGINE=MARIADB_10.6 bash install.sh
- Login via SSH to the Instance.
ssh -i path_to_your_private_key azure@yourIpAddress
- Switch to the root user:
sudo su root
- Update the system and install the required packages.
apt update && apt -y upgrade && apt -y install curl wget sudo
- Run the installer with your preferred Database Engine.
- MySQL 8.4
- MySQL 8.0
- MariaDB 11.8
curl -sS https://installer.cloudpanel.io/ce/v2/install.sh -o install.sh; \
echo "6eac061df80f08b75224fcd7fce2f115e201696d8a6122e31abf7259a813b462 install.sh" | \
sha256sum -c && sudo CLOUD=msa DB_ENGINE=MYSQL_8.4 bash install.sh
curl -sS https://installer.cloudpanel.io/ce/v2/install.sh -o install.sh; \
echo "6eac061df80f08b75224fcd7fce2f115e201696d8a6122e31abf7259a813b462 install.sh" | \
sha256sum -c && sudo CLOUD=msa DB_ENGINE=MYSQL_8.0 bash install.sh
curl -sS https://installer.cloudpanel.io/ce/v2/install.sh -o install.sh; \
echo "6eac061df80f08b75224fcd7fce2f115e201696d8a6122e31abf7259a813b462 install.sh" | \
sha256sum -c && sudo CLOUD=msa DB_ENGINE=MARIADB_11.8 bash install.sh
- Login via SSH to the Instance.
ssh -i path_to_your_private_key azure@yourIpAddress
- Switch to the root user:
sudo su root
- Update the system and install the required packages.
apt update && apt -y upgrade && apt -y install curl wget sudo
- Run the installer with your preferred Database Engine.
- MySQL 8.4
- MySQL 8.0
- MariaDB 11.4
- MariaDB 10.11
curl -sS https://installer.cloudpanel.io/ce/v2/install.sh -o install.sh; \
echo "6eac061df80f08b75224fcd7fce2f115e201696d8a6122e31abf7259a813b462 install.sh" | \
sha256sum -c && sudo CLOUD=msa DB_ENGINE=MYSQL_8.4 bash install.sh
curl -sS https://installer.cloudpanel.io/ce/v2/install.sh -o install.sh; \
echo "6eac061df80f08b75224fcd7fce2f115e201696d8a6122e31abf7259a813b462 install.sh" | \
sha256sum -c && sudo CLOUD=msa DB_ENGINE=MYSQL_8.0 bash install.sh
curl -sS https://installer.cloudpanel.io/ce/v2/install.sh -o install.sh; \
echo "6eac061df80f08b75224fcd7fce2f115e201696d8a6122e31abf7259a813b462 install.sh" | \
sha256sum -c && sudo CLOUD=msa DB_ENGINE=MARIADB_11.4 bash install.sh
curl -sS https://installer.cloudpanel.io/ce/v2/install.sh -o install.sh; \
echo "6eac061df80f08b75224fcd7fce2f115e201696d8a6122e31abf7259a813b462 install.sh" | \
sha256sum -c && sudo CLOUD=msa DB_ENGINE=MARIADB_10.11 bash install.sh
- Login via SSH to the Instance.
ssh -i path_to_your_private_key azure@yourIpAddress
- Switch to the root user:
sudo su root
- Update the system and install the required packages.
apt update && apt -y upgrade && apt -y install curl wget sudo
- Run the installer with your preferred Database Engine.
- MySQL 8.0
- MySQL 5.7
- MariaDB 11.4
- MariaDB 10.11
- MariaDB 10.6
curl -sS https://installer.cloudpanel.io/ce/v2/install.sh -o install.sh; \
echo "6eac061df80f08b75224fcd7fce2f115e201696d8a6122e31abf7259a813b462 install.sh" | \
sha256sum -c && sudo CLOUD=msa DB_ENGINE=MYSQL_8.0 bash install.sh
curl -sS https://installer.cloudpanel.io/ce/v2/install.sh -o install.sh; \
echo "6eac061df80f08b75224fcd7fce2f115e201696d8a6122e31abf7259a813b462 install.sh" | \
sha256sum -c && sudo CLOUD=msa DB_ENGINE=MYSQL_5.7 bash install.sh
curl -sS https://installer.cloudpanel.io/ce/v2/install.sh -o install.sh; \
echo "6eac061df80f08b75224fcd7fce2f115e201696d8a6122e31abf7259a813b462 install.sh" | \
sha256sum -c && sudo CLOUD=msa DB_ENGINE=MARIADB_11.4 bash install.sh
curl -sS https://installer.cloudpanel.io/ce/v2/install.sh -o install.sh; \
echo "6eac061df80f08b75224fcd7fce2f115e201696d8a6122e31abf7259a813b462 install.sh" | \
sha256sum -c && sudo CLOUD=msa DB_ENGINE=MARIADB_10.11 bash install.sh
curl -sS https://installer.cloudpanel.io/ce/v2/install.sh -o install.sh; \
echo "6eac061df80f08b75224fcd7fce2f115e201696d8a6122e31abf7259a813b462 install.sh" | \
sha256sum -c && sudo CLOUD=msa DB_ENGINE=MARIADB_10.6 bash install.sh
Access CloudPanel
Security
For security reasons, access CloudPanel as fast as possible to create the admin user. There is a small time window where bots can create the user. If possible, open port 8443 only for your IP via firewall.
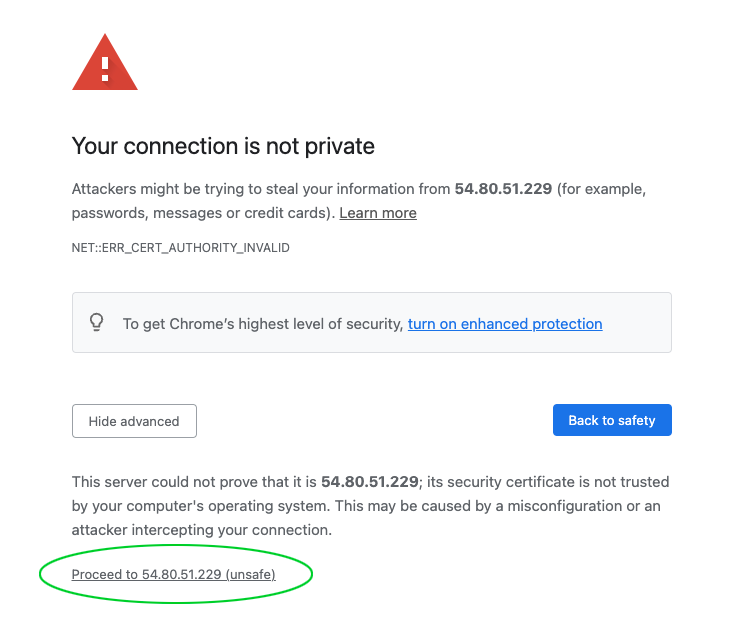
You can now access CloudPanel via Browser: https://yourIpAddress:8443
Ignore the self-signed certificate warning and click on Advanced and Proceed to continue to CloudPanel.