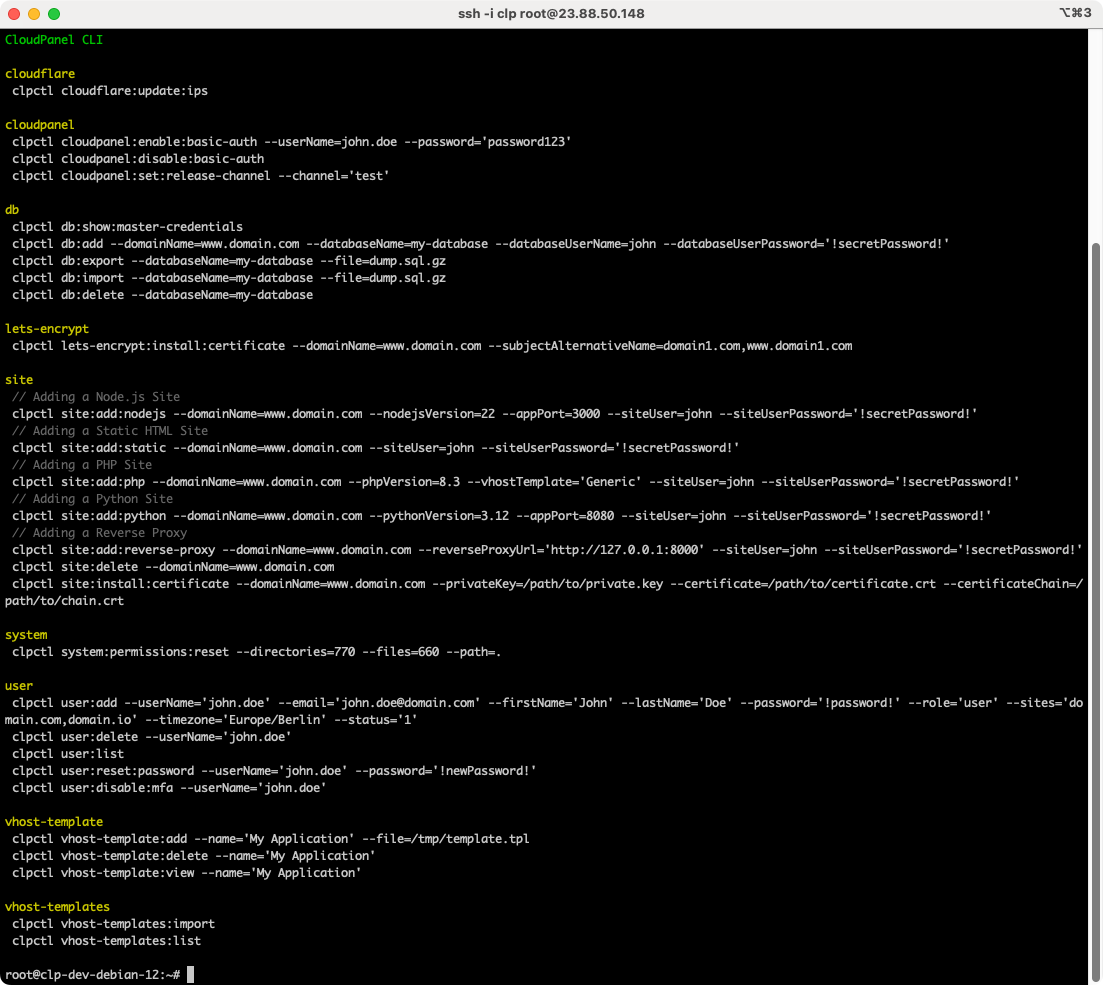
Root User Commands
Cloudflare
Update IPs
In your site's security settings, you can enable Allow traffic from Cloudflare only.
The command clpctl cloudflare:update:ips is being executed every morning at 6 AM via cron job and updates the following file:
/etc/nginx/cloudflare/ips
If you enable Allow traffic from Cloudflare only, the file is included in the vhost of your site.
CloudPanel
In the Admin Area, you can enable Basic Auth as additional layer of security in front of CloudPanel if you don't have a static IP to close port 8443.
Enable Basic Auth
clpctl cloudpanel:enable:basic-auth --userName=john.doe --password='password123'
Disable Basic Auth
clpctl cloudpanel:disable:basic-auth
Database
Master Credentials
The Database Show Master Credentials command shows Host, User Name, Password, and the Port.
clpctl db:show:master-credentials
The output will look like:
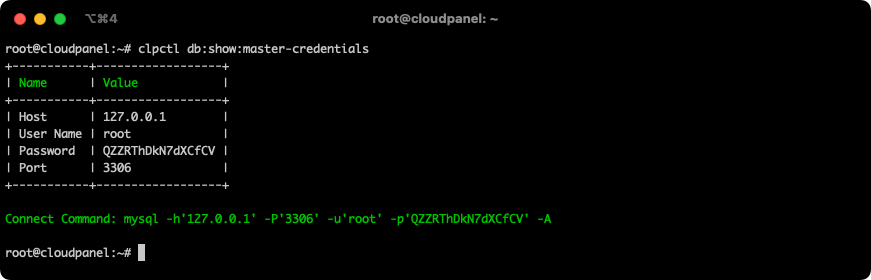
To connect to the database server, copy the Connect Command and enter the command in the command line.
Adding a Database
With the command db:add, you can add a database to your site.
clpctl db:add --domainName=www.domain.com --databaseName=my-database --databaseUserName=john --databaseUserPassword='!secretPassword!'
Database Export
With the command db:export, you can export a database as dump.
Compression
The database dump will be gzipped if you add .sql.gz at the end of the file name. If you want to export the database uncompressed, use .sql.
clpctl db:export --databaseName=my-database --file=dump.sql.gz
Database Import
To import a database, go to the database dump's directory and use the following command to import.
clpctl db:import --databaseName=my-database --file=dump.sql.gz
Let's Encrypt
With the lets-encrypt:install:certificate command, you can issue and install a Let's Encrypt Certificate for a site.
Let's Encrypt
If you enter the domain name www.domain.com, a certificate for the domains domain.com and www.domain.com will be issued and vice versa.
Make sure to have valid DNS records for the domains you want to create a certificate for.
clpctl lets-encrypt:install:certificate --domainName=www.domain.com
The parameter subjectAlternativeName is optional and is needed if you want to issue a certificate for multiple domains.
clpctl lets-encrypt:install:certificate --domainName=www.domain.com --subjectAlternativeName=domain1.com,www.domain1.com
Site
Adding a Node.js site
Node 22 LTS, Node 20 LTS, Node 18 LTS, Node 16 LTS, Node 14 LTS, Node 12 LTS are available. The Node.js Versions are managed via Node Version Manager.
If you need another version, you can change the version afterward.
To add a Node.js Site, use the following command.
clpctl site:add:nodejs --domainName=www.domain.com --nodejsVersion=22 --appPort=3000 --siteUser=john --siteUserPassword='!secretPassword!'
Adding a Static HTML Site
To add a Static HTML Site, use the following command.
clpctl site:add:static --domainName=www.domain.com --siteUser=john --siteUserPassword='!secretPassword!'
Adding a PHP Site
For Adding a PHP Site, it's important to use the right Vhost Template.
With the command vhost-templates:list, you can display all available vhost templates:
clpctl vhost-templates:list
The vhost templates can be found on Github. They will be updated every night.
Copy the name of the template and use the following command to create a PHP Site:
clpctl site:add:php --domainName=www.domain.com --phpVersion=8.4 --vhostTemplate='Generic' --siteUser=john --siteUserPassword='!secretPassword!'
Adding a Python Site
To add a Python Site, use the following command:
Python Version
If you are using Ubuntu 22.04, you need to use the version 3.10 as it's the standard version.
clpctl site:add:python --domainName=www.domain.com --pythonVersion=3.9 --appPort=8080 --siteUser=john --siteUserPassword='!secretPassword!'
Adding a Reverse Proxy
To add a Reverse Proxy, use the following command:
clpctl site:add:reverse-proxy --domainName=www.domain.com --reverseProxyUrl='http://127.0.0.1:8000' --siteUser=john --siteUserPassword='!secretPassword!'
Installing a Certificate
To install a certificate for a site, use the following command below. The certificateChain argument is optional.
clpctl site:install:certificate --domainName=www.domain.com --privateKey=/path/to/private.key --certificate=/path/to/certificate.crt --certificateChain=/path/to/chain.crt
Deleting a Site
To delete a Site, use the following command:
clpctl site:delete --domainName=www.domain.com
Confirm your action by entering yes. It's also possible to force the deletion by adding the "--force" parameter as seen below:
clpctl site:delete --domainName=www.domain.com --force
User
Adding a User
To add a User, see the following commands as example.
To add an admin user, use the following command:
clpctl user:add --userName='john.doe' --email='john.doe@domain.com' --firstName='John' --lastName='Doe' --password='!password!' --role='admin' --timezone='UTC' --status='1'
To add a site manager, use the following command:
clpctl user:add --userName='john.doe' --email='john.doe@domain.com' --firstName='John' --lastName='Doe' --password='!password!' --role='site-manager' --timezone='UTC' --status='1'
To add a user who is restricted to specific sites, use the following command:
clpctl user:add --userName='john.doe' --email='john.doe@domain.com' --firstName='John' --lastName='Doe' --password='!password!' --role='user' --sites='domain.com,domain.io' --timezone='UTC' --status='1'
Deleting a user
clpctl user:delete --userName='john.doe'
List Users
To list all users, use the following command:
clpctl user:list
Password Reset
To reset the password for a CloudPanel user, you can use the user:reset:password command:
clpctl user:reset:password --userName=john.doe --password='!newPassword!'
Disable 2-FA
To disable Two-Factor Authentication for a user, run the following command:
clpctl user:disable:mfa --userName=john.doe
Vhost Templates
Import Templates
The command vhost-templates:import is being executed every night. It updates the Vhost Templates from our Github Repository.
clpctl vhost-templates:import
List Templates
The command vhost-templates:list lists all Vhost Templates that can be used for adding a PHP Site.
clpctl vhost-templates:list
Adding a Template
If you need a custom Vhost Template for your PHP Application, you can do the following:
- Copy a vhost template from our Github Repository, e.g., the Generic one:
#{"rootDirectory":"public","phpVersion":"8.4"}
server {
  listen 80;
  listen [::]:80;
  listen 443 ssl http2;
  listen [::]:443 ssl http2;
  {{ssl_certificate_key}}
  {{ssl_certificate}}
  {{server_name}}
  {{root}}

  {{nginx_access_log}}
  {{nginx_error_log}}

  if ($scheme != "https") {
    rewrite ^ https://$host$uri permanent;
  }

  location ~ /.well-known {
    auth_basic off;
    allow all;
  }

  {{settings}}

  try_files $uri $uri/ /index.php?$args;
  index index.php index.html;

  location ~ \.php$ {
    include fastcgi_params;
    fastcgi_intercept_errors on;
    fastcgi_index index.php;
    fastcgi_param SCRIPT_FILENAME $document_root$fastcgi_script_name;
    try_files $uri =404;
    fastcgi_read_timeout 3600;
    fastcgi_send_timeout 3600;
    fastcgi_param HTTPS $fastcgi_https;
    fastcgi_pass 127.0.0.1:{{php_fpm_port}};
    fastcgi_param PHP_VALUE "{{php_settings}}";
  }

  location ~* ^.+\.(css|js|jpg|jpeg|gif|png|ico|gz|svg|svgz|ttf|otf|woff|eot|mp4|ogg|ogv|webm|webp|zip|swf)$ {
    add_header Access-Control-Allow-Origin "*";
    expires max;
    access_log off;
  }

  if (-f $request_filename) {
    break;
  }
}
- In the first line, you see the following command:
#{"rootDirectory":"public","phpVersion":"8.4"}
Setting the rootDirectory and phpVersion is very important to prefill the site wizard form.
Most PHP Applications use public nowadays as an entry point.
- Put the template in a file or via gist.
To import your template from a file, use the following command:
clpctl vhost-template:add --name='My Application' --file=/tmp/template.tpl
To import your template from remote e.g, from a gist, use the following command:
clpctl vhost-template:add --name='My Application' --file=https://gist.githubusercontent.com/swieczorek/1c344ca356118c45b7c1b7393cc00abc/raw/007ff01dff96978be65dca212990ac20f6fd16be/gistfile1.txt
When you select My Application, it will prefill the PHP Version, which has been defined in the Vhost Template.
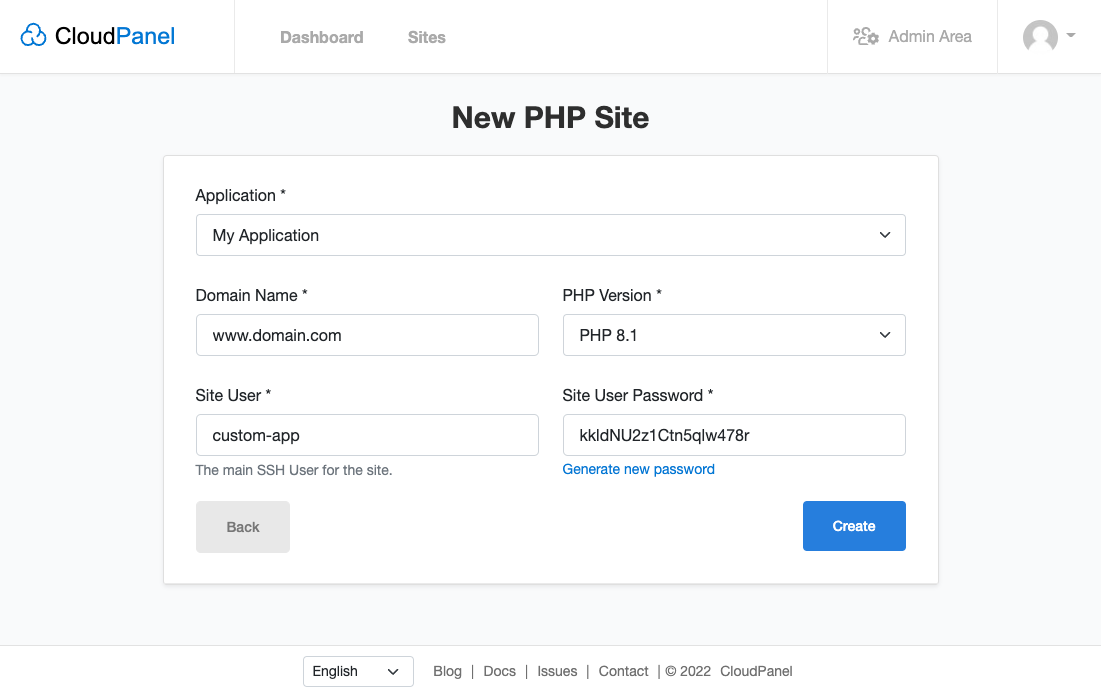
When you click on Create, the root directory for the NGINX VHost will be generated with the following pattern:
/home/$siteUser/htdocs/$domainName/$rootDirectory
In our example, the root directory would be:
/home/custom-app/htdocs/www.domain.com/public
Deleting a Template
With the command vhost-template:delete, you can delete a Vhost Template:
clpctl vhost-template:delete --name='My Application'
Viewing a Template
With the command vhost-template:view, you can view a Vhost Template:
clpctl vhost-template:view --name='My Application'